Installation
Kitchen Sink Guide: Essential Parts for Installation and Repair
The sink is likely the busiest area in any home or commercial kitchen. It’s where hands, dishes, and food are washed; it’s the source of water drawn for cooking or cleaning; and sometimes it’s the receptacle for food waste if it includes a garbage disposal unit. As is true of most kitchen appliances that see daily action, a sink and its parts will need repairs, or replacement, at some point. Follow our helpful guide to learn the parts of a kitchen sink, how to replace a worn or damaged faucet, and how to install a new basin.
Parts of a Kitchen Sink
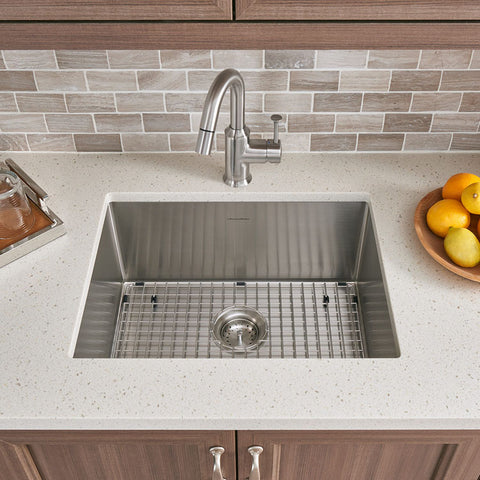
A kitchen sink configuration includes many parts that work together to keep this fixture operating smoothly. Some parts are situated above the countertop, others beneath it. These kitchen sink parts can wear or break over time and will need repairing or replacing when they no longer function properly. Knowing the names of the parts, where they’re located, and what they do makes DIY repairs easier. Though most of these basic parts are found on a standard kitchen sink, others, such as a disposal, are optional.
Basin: The basin is often referred to simply as the sink; it catches the water that comes from the faucet and includes a drain hole in the bottom. Double and single kitchen sink basins come in different sizes, shapes, and styles to fit the cutout on the countertop.
Drain: The drain is the hole in the basin where the water escapes the sink and flows into the plumbing pipes underneath.
Shut-off valve: This oval-shaped handle under the sink lets you control water flow, or shut it off completely, without affecting the water supply to the rest of the house.
Water supply lines: Installed underneath the kitchen sink, the supply lines bring water from the source to the tap. You’ll typically find one pipe or tube for hot water and one for cold; some supply lines are made in red or blue PEX tubing to differentiate between the two.
Escutcheon: A piece of hardware that attaches at the base of the faucet or handles to conceal the holes and pipes that come through the sink deck.
Spray head: Some sinks include a spray head connected to a hose that pulls out from the deck. A spray head hose runs on the same water supply line as the faucet.
Garbage disposal: A garbage disposal grinds up food waste into small particles before sending them down the drain. The disposal is situated under the sink but connects to a drain hole in the bottom of the basin.
Kitchen Sink Drain Parts
The kitchen sink drain includes additional parts essential to the function of the sink, from liquid drainage to the entrapment of large particles to prevent clogs. Many kitchen sink drain parts are easy to repair or replace using the proper tools.
Sink Strainer: This part sits right in the opening of the kitchen sink drain. The sink strainer seals the drain hole, directs water flow, and prevents large pieces of debris from entering the sewage system.
Tailpiece: Sometimes called the drain tailpiece, this section of pipe connects to the drain fitting and transports water down the pipe and away from the sink.
P-trap: Shaped like a sideways letter “P,” the P-trap captures heavy particles and debris, but its main function is to prevent sewage gas from seeping through the drain and into the home.
Cleanout: Located near the P-trap, a sink drain cleanout is a removable fitting that allows access to the pipes so you can clear clogs and remove debris when needed.
Gaskets: Both friction and rubber gaskets prevent leakage in areas where two pipes connect in the drain system.
Kitchen Sink Faucet Parts

The faucet is the most important part of the sink outside of the basin. Kitchen sink faucets come in various shapes and styles, but they all include three parts that may need repairing or replacing over time.
Spout: Water exits the plumbing system and empties into the sink from this piece. Some faucets come with an attached pull-down or pull-out spray head that eliminates the need for a separate side sprayer.
Handle: Configurations vary from two handles on either side of the spout to one lever attached above or beside it. The handle allows you to control the water flow and temperature.
Aerator: The aerator is a small part with a mesh screen that screws onto the end of the faucet spout; it reduces the volume of water flow and shapes the stream as it exits the tap.
Kitchen Sink Faucet Repair and Replacement
Whether the faucet shows signs of wear or your kitchen simply needs updating, a new unit can enhance the look and functionality of the sink. Choose the faucet that fits best based on the number of holes in the countertop or sink deck. DIY replacement is easy when the faucet configuration is the same; for example, replace a single-handle kitchen sink faucet with another single-handle unit for continuity. Consult a professional if you want to change from a one-hole to a two-handle unit or vice-versa.
How to Replace a Kitchen Sink Faucet
Follow these steps to replace your kitchen sink faucet.
- Remove all items underneath the kitchen sink.
- Shut off all of the water supply lines and open up the faucet handles to relieve pressure in the plumbing system.
- Snap a photo of the pipes and lines under the sink for reference when you put it back together later.
- Disconnect the water supply lines; you may need a small bucket to catch any excess water in the lines.
- Use a wrench to remove any nuts, bolts, and hardware that secures the faucet from underneath.
- Lift the faucet out of the hole.
- Clean the area around the hole on the top of the sink deck with an approved solution.
- Refer to the manufacturer's instructions to set and secure the escutcheon or deck plate.
- Install the new faucet; remount and attach it from underneath with the hardware that comes with the unit.
- Reconnect the water supply lines to the new faucet.
- Remove the aerator.
- Turn on the water supply to flush the lines and test the unit; make sure there are no leaks in the spout or sprayer.
- Turn off the faucet and replace the aerator.
To replace a damaged faucet aerator, simply unscrew it from the end of the faucet. Use pliers or a wrench if necessary. Screw in the new aerator so it’s tight enough to stay securely in place when the water flows at maximum volume.
How to Install and Replace a Kitchen Sink Basin
It is possible to replace a kitchen sink basin yourself as long as the sink setup and type are similar. Start with the right tools and supplies, including an adjustable wrench, utility knife, a screwdriver, and silicone caulk, and follow these basic steps to install a new above-mount or drop-in sink basin.
- Turn off the water and shut off the supply lines underneath the sink.
- Turn on the faucet for about a minute to relieve pressure inside the pipes.
- Snap a photo of the pipe configuration under the sink so you’ll know how to reconnect them later.
- Take apart the pipes under the sink using an adjustable wrench. There may be several pipes to disconnect.
- Remove any screws, clamps, or clips that secure the sink underneath the countertop.
- Gently scrape off any caulk around the edges of the sink on the countertop.
- Carefully lift the old sink out of its opening.
- Clean the area around the opening in the sink deck with an approved solution.
- Place the new sink into the opening to ensure it fits.
- Remove the sink and apply a layer of silicone caulk around the edges where it meets the countertop.
- Place the sink back into the hole and apply slight pressure to create a bond with the silicone adhesive. Let the adhesive dry for at least 12 hours.
- To install the new drain strainer, roll a small amount of plumber’s putty between your fingers to make it malleable; spread it around the strainer rim. Place the drain strainer into the hole and press it into place. Remove excess putty with a utility knife.
- Reconnect the screws, clamps, or clips that secure the sink to the countertop.
- Reconnect the pipes based on the earlier photo you made of their configuration.
- Turn on the water supply lines.
Consult a professional for assistance with a kitchen sink that requires more detailed installation.
Now that you know all about the parts of a kitchen sink and how to make basic repairs and replacements, check out Riverbend Home for kitchen faucets, kitchen sinks, sink accessories, and plumbing supplies.