Buying Guide
How to Choose a Runtal Baseboard Radiator
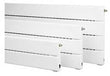
If you're one of the many homeowners in the process of upgrading the radiators or baseboard heaters in your home, perhaps you should consider replacing your old wall unit with a Runtal electric or hydronic baseboard heater. Runtal Radiators offer the unparalleled comfort of radiant heat and sleek Eurostyle design for an affordable price.
Determine Wattage and BTUHs Needed for the Size of Your Space
A number of factors will affect the effectiveness of your heater such as inadequate insulation, drafty windows, and the height of the ceiling. To determine what size heater will properly heat your space, you first need to determine the size of the room you want to heat.
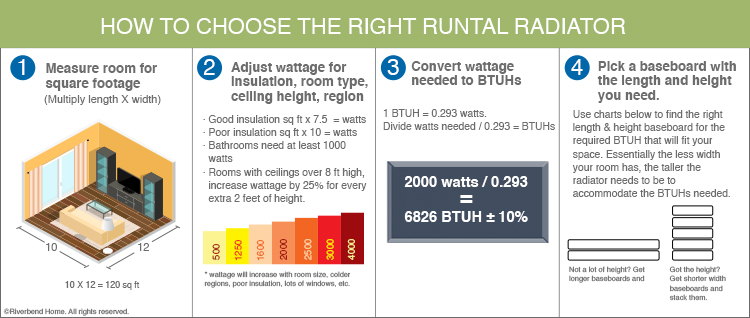
Step 1 – Measure the Room
Measure the length and width of your room using a tape measure.
Step 2 - Calculate the Square Footage
Multiply the length by the width of your room (in feet). This will give you a measurement in square feet. For example, if your room measures 12′ long x 10′ wide, the overall square footage of the room is 120 square feet.
Step 3 – Insulation
Insulation is vital in helping to prevent heat loss in your home. Poorly insulated rooms will use more energy to heat them while well insulated rooms require less heat to keep them warm. Older homes will generally have poor insulation unless the house has been recently renovated. The more insulation, the less heat escapes, and the fewer watts you will need to heat the space properly. To calculate the wattage required, you need to multiply the square footage of the room by 10. Thus, a 120 square foot room will need 1200 watts to keep it warm.
For rooms with insufficient insulation, you need to factor 12.5 watts of heating energy per square foot to effectively warm the space. For homes with R-11 (3½″ thick) insulation in the walls and R-19 (6″ – 6¼″ thick) insulation in the ceiling, you will need to use 10 watts per square foot. In new, energy-efficient homes designed with full insulation up to modern codes (R-19 in walls and R-38 (12″ thick) in ceilings), you will only need 7.5 watts per square foot. In general, poorly insulated rooms will require approximately 25% more wattage to heat them. Fully insulated rooms will require 25% less wattage.
Step 4 – Make Needed Adjustments
The wattage required per square foot listed above are calculated for an average room such as a living room or bedroom. If your room is a bathroom, then you need to use a minimum of a 1000 watt heater. If your ceilings are over 8 feet high, then you will need to increase the heater wattage by 25% for every extra two feet of height. Also, if you live in a region with harsher winters, you will need a more powerful heater to compensate for the colder temperatures. Colder regions need at least 12 watts/sq ft, moderate regions need at least 10 watts/sq ft, and warm regions need at least 7 watts/sq ft.
Choosing a Heater
Now that you have a general idea of the wattage you need, your next step is to choose your heater. Runtal models are rated by BTUHs (British Thermal Units per Hour) that measures the heat energy required to heat a room rather than the power. You convert the wattage to BTUHs. One BTUH is approximately 0.293 watts. Conversely, a single watt converts to approximately 3.412 BTUs per hour.
- Determine the height and length of the wall area you want to use for the radiator(s).
- Divide the BTUH (British Thermal Units per Hour) requirement of the room by the total length of wall space chosen for radiator placement. This will establish the BTUH per foot required.
- Select a model which has a BTUH per foot rating within ±10% of the level calculated for the unit (Note that BTUH for the vertical panel is per foot of HEIGHT while others are per foot of LENGTH).
The following are two handy charts that give you the size and heat output for different hydronic and electirc Runtal models.
Hydronic Baseboard Outputs |
||||||
|
UF-2  |
UF-3  |
UF-4  |
UF-6  |
UF-8  |
||
| Length | Height | |||||
|
6″ |
9″ |
12″ |
18″ |
24″ |
||
|
2′ |
1200 | 1540 | 1860 | 2860 | 3620 | |
|
2.5′ |
1500 | 1925 | 2325 | |||
|
3′ |
1800 | 2310 | 2790 | 4290 | 5430 | |
|
3.5′ |
2100 | 2695 | 3255 | |||
|
4′ |
2400 | 3080 | 3720 | 5720 | 7240 | |
|
5′ |
3000 | 3850 | 4650 | |||
|
6′ |
3600 | 4620 | 5580 | |||
|
7′ |
4200 | 5390 | 6510 | |||
|
8′ |
4800 | 6160 | 7440 | |||
|
9′ |
5400 | 6930 | 8370 | |||
|
10′ |
6000 | 7700 | 9300 | |||
|
11′ |
6600 | 8470 | 10230 | |||
|
12′ |
7200 | 9240 | 11160 | |||
|
13′ |
7800 | 10010 | 12090 | |||
|
14′ |
8400 | 10780 | 13020 | |||
One BTUH is approximately 0.293 watts
Electric Baseboard Outputs |
||||||
 |
||||||
| Length | Model | |||||
|
EB3-120D |
EB3-208D |
EB3-240D |
||||
|
36″ |
1500 | 1500 | 1500 | |||
|
48″ |
2000 | 2000 | 2000 | |||
|
60″ |
2500 | 2500 | 2500 | |||
|
72″ |
3000 | 3000 | 3000 | |||
|
84″ |
3500 | 3500 | 3500 | |||
|
96″ |
4000 | 4000 | 4000 | |||
|
108″ |
4500 | 4500 | 4500 | |||
|
120″ |
5000 | 5000 | 5000 | |||
One BTUH is approximately 0.293 watts
It's important you verify that the electrical supply wiring is the same voltage as the electric baseboard heater. Connecting a 208 volt electric baseboard radiator to 240 volt supply will increase the heater's output; connecting a 240 volt heater to a 208 volt supply will decrease the heater's output.
Additional Information
A Runtal heater may be used as a direct replacement for fin-tube or cast iron baseboard heaters, and it may be used with water temperatures as low as 140 degrees F (making it a perfect radiant alternative or complement to floor heating). Runtal baseboard heaters come in heights of 6″, 9″ and 12″ and 2′-14′ lengths. Wall panels come in 18″ and 24″ heights and 2′, 3′, or 4′ lengths.
Uniform fittings allow each hydronic radiator to be piped into your system eight different ways. Continuous mounting eliminates the need for backing. The unit is easy to install, simply wall mount it with the included hardware. All pipe fittings are ½″ NPT with ⅛″ NPT vent fittings. You can also order pipe covers.
Installation Tips for Baseboard/Wall Panels
Roughing In - The rough-in dimensions are the same for all five heights
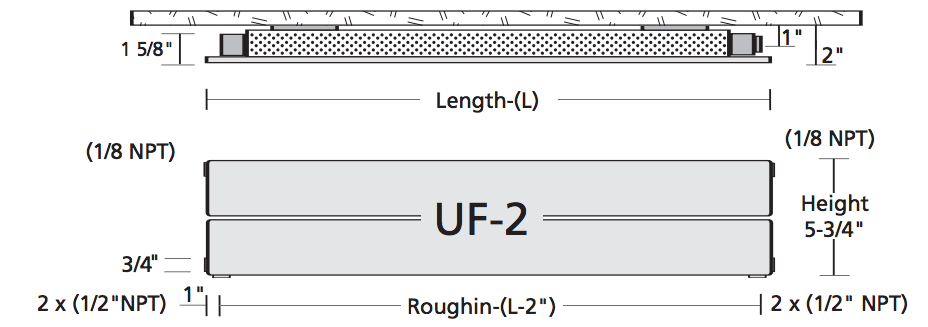
- Always plan to pipe directly into the radiator. "U" shapes should be avoided.
- Always check your piping scheme in advance to be sure of clearance from joists, etc.
Mounting - The mounting system is identical on all five heights
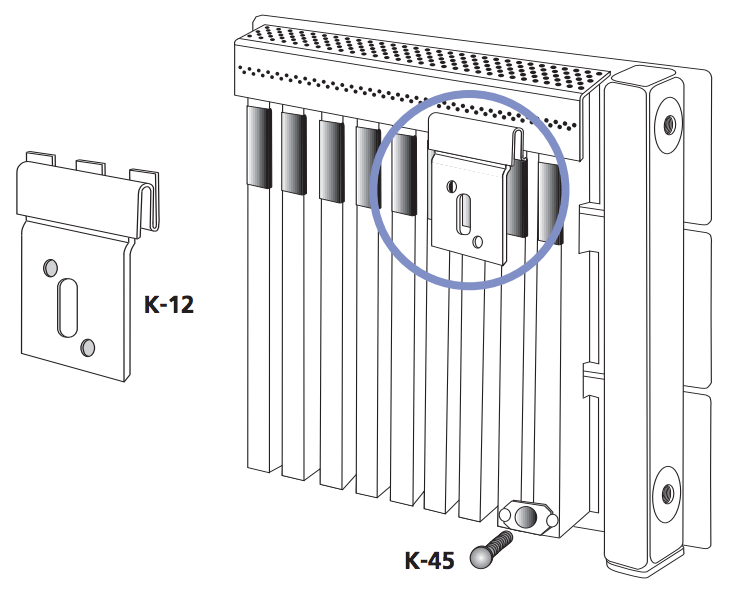
- Use all of the K-12 brackets provided with each radiator.
- Place one bracket 6″ in from each end, and equally space the rest.
- Mount bracket on studs whenever possible (use appropriate method for non-stud mounting using wall-mount anchors).
- Mount radiators 3″ from the floor for optimum efficiency, ease of vacuuming, and proper trim cover fit. (However, a minimum of 1″ between radiator and finished floor is permissible.)
- Be sure to install leveling bolt (K-45) prior to piping radiator.
Piping - Each radiator may be piped eight different ways
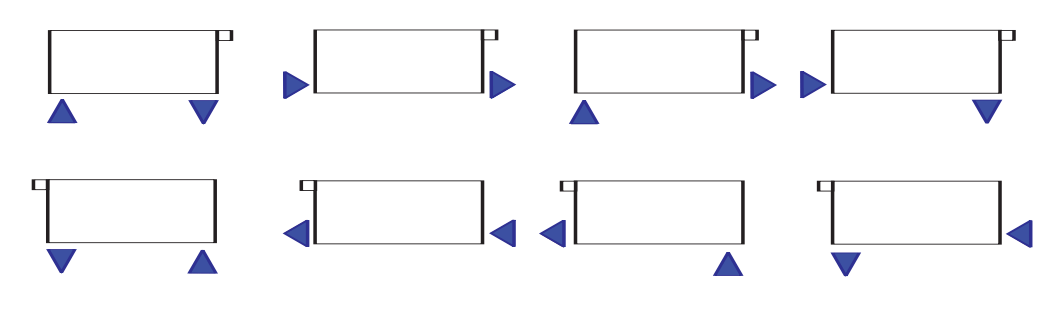
- Piping should be kept to a minimum and should be planned to match the standard trims.
- Always install the air vent (included) opposite the supply side of the radiator.
- Be sure to properly seal the flush plugs (included) in the unused fittings (3/8″ and 3/16″ hex wrenches required).
- Be sure to leave room for piping inside corners. You will need 2″-3″ plus working room, minimum.
Vertical Covers
These come standard in 3″ and 10″ heights and are designed to cover straight vertical pipe between the radiator and the floor. They can be easily field cut for heights other than 3″ and 10″.

- Wrap the exposed pipes with the insulation.
- Fold the trim tabs down and slip the cover over the pipe.
- Once in position, squeeze the cover back to its original shape and fold the tabs back to their original vertical positions (the tabs keep the trim piece from rotating on the pipe).
Horizontal Covers
Standard trims simply snap into place. Straight Trims (used as End Trims and Center Trims) are 12″ long. Inside Corners are 12″ x 12″ and End Cap Trims are either 6″ x 2″ (right hand) or 2″ x 6″ (left hand). Outside Corner Trims and other special trims are readily available on request.
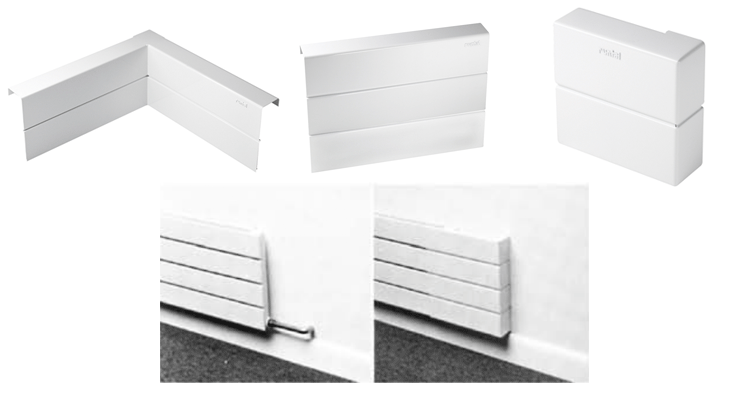
- Horizontal trims require a minimum of 2″ overlap on the radiator for proper fit.
- It may be easier to purchase trims after the radiators are installed, but care should be taken to ensure that all piping has been done with standard trim configurations in mind.
System - Runtal will work well in both high and low temperature closed loop systems
- Always test the system with air at a maximum pressure of 50 PSI prior to wet testing.
- Runtal baseboard may be used with fin-tube, but the fin-tube will perform better if the Runtal is at the end of the loop.
- Runtal is compatible with cast iron baseboard and cast iron radiators.
- In series installation, an individual loop should not exceed 30,000 BTUH or seven radiators.
Upgrading your old radiator to a new Runtal baseboard heater will help you stay warm this winter while saving you money on your heating, and give your room an updated, sleek look. We have a great selection of Runtal models in a variety of sizes in both electric and hydronic baseboard heaters